How to Secure a Private AI Server with OPNsense
Quick Answer
To secure an AI server with OPNsense, create a dedicated AI-VLAN (VLAN 50), assign your GPU node to it, and implement a Default Deny Egress rule. Allow only specific internal management traffic and block the server from initiating any connections to the public internet.
Prerequisites
- OPNsense Appliance: Hardware or VM (e.g., Deciso, Protectli, or custom build).
- Switch: Managed switch with 802.1Q VLAN support (or direct attachment to an OPNsense port).
- AI Server: Linux host with a dedicated physical NIC or a configured VLAN sub-interface.
- Access: Existing LAN connectivity for the initial OPNsense configuration.
Introduction
An AI inference server is a high-value target. It contains proprietary model weights, sensitive prompt history, and often has direct access to corporate data via RAG (Retrieval-Augmented Generation) pipelines.
Placing this server on your general office network is a critical security failure. This guide explains how to use OPNsense to build a network-level “sandbox” that isolates your AI workloads without breaking their functionality.
The Strategy: Micro-Segmentation
We follow the principle of least privilege. An AI server only needs to:
- Receive API requests from internal services.
- Resolve local DNS.
- (Occasionally) pull updates from verified repositories.
It does not need to browse the web, talk to other VLANs, or send outbound telemetry.
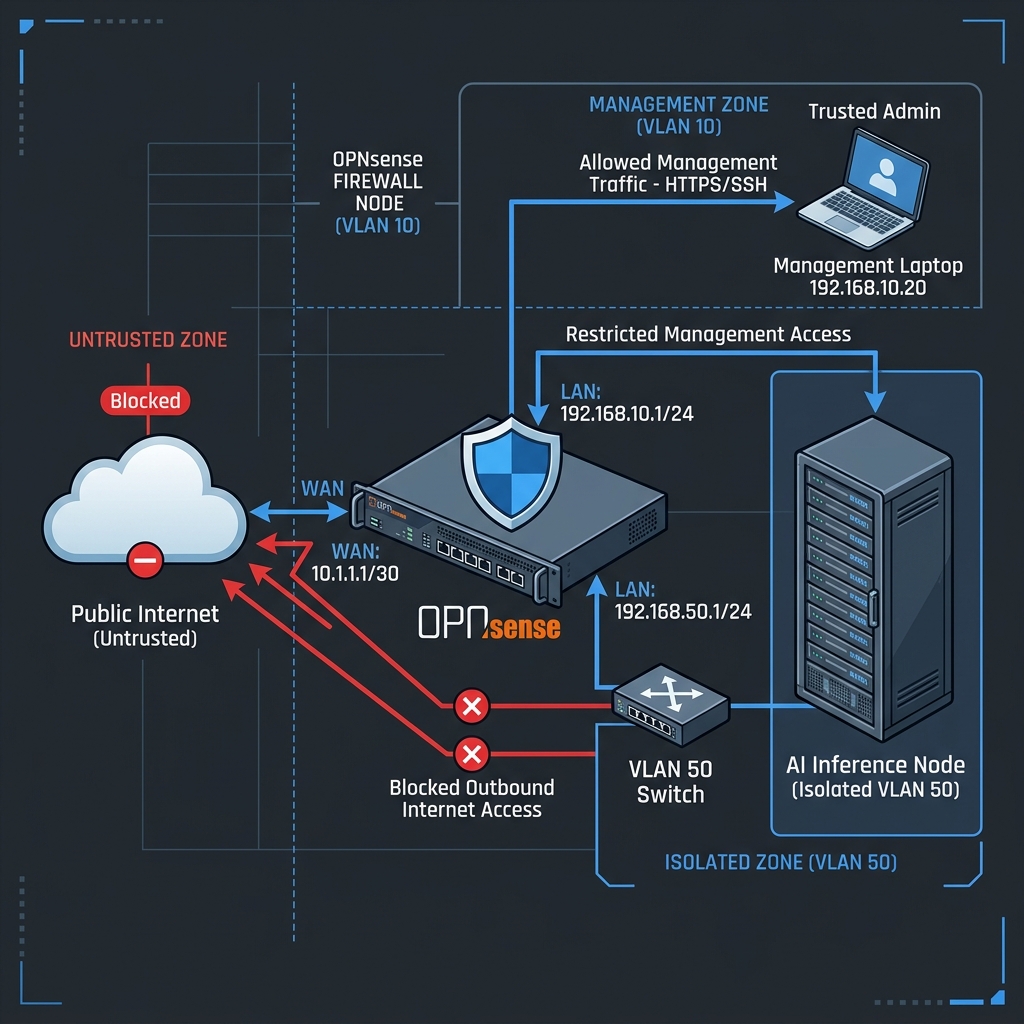
Step 1: VLAN Configuration
On your OPNsense appliance, navigate to Interfaces > Other Types > VLAN.
- Device:
vlan0.1 - Tag:
50 - Description:
AI_SOVEREIGN - Parent Interface: Your LAN or Trunk port.
After creating the VLAN, go to Interfaces > [Assignments] and assign the new VLAN. Enable the interface and set a Static IPv4 address (e.g., 10.50.0.1/24).
Step 2: Hardened Firewall Rules
Go to Firewall > Rules > AI_SOVEREIGN. Rules are processed from top to bottom.
1. Allow Internal DNS
AI servers need to find local resources.
- Action: Pass
- Protocol: UDP
- Source:
AI_SOVEREIGN net - Destination:
AI_SOVEREIGN address(The OPNsense IP) - Port: 53
2. Allow API Ingress
Allow your management machine or trusted API gateway to talk to the AI node.
- Action: Pass
- Protocol: TCP
- Source:
Trusted_IP - Destination:
AI_Node_IP - Port: 11434 (Ollama) or 3000 (WebUI)
3. Kill Switch (Default Deny)
This is the most important rule.
- Action: Block
- Protocol: Any
- Source:
AI_SOVEREIGN net - Destination:
Any - Description: Default Deny Egress
Step 3: Deep Packet Inspection (Optional)
If your OPNsense hardware supports it, enable Zenarmor or Suricata (IDS/IPS) on the AI VLAN.
- Zenarmor: Use this for layer 7 visibility. It allows you to see if the AI server is attempting to bypass your blocks via unusual ports or encrypted tunnels.
- Suricata: Use the “Emerging Threats” ruleset to detect known command-and-control (C2) patterns.
Security Notes: The Air-Gap Problem
When you implement a strict block, you will break the AI server’s ability to update its OS or pull new Docker images.
The OpsNexus Solution:
- Do not disable the firewall rule to update. Instead, use an Update Alias.
- Create a URL Table Alias in OPNsense containing the IPs of
archive.ubuntu.comandghcr.io. - Create a temporary “Allow” rule using this Alias as the destination.
- Disable the rule when the update is complete.
Common Failure Modes
- VLAN Leakage: The AI server can still ping the office LAN. Fix: Ensure you have a “Block” rule at the bottom of your AI_SOVEREIGN rules that targets
Private Networksas the destination. - DNS Timeout: Docker containers fail because they can’t reach the internet DNS. Fix: Configure OPNsense’s Unbound DNS to act as a resolver and ensure the “Allow DNS” rule (Step 2.1) is active.
- No Inference Access: You can’t reach the WebUI. Fix: Check the source IP of your management machine. If you are on a different VLAN, you need a “Pass” rule on the source interface allowing traffic to the AI_SOVEREIGN net.
Verification & Troubleshooting
Perform these tests from the AI server command line to ensure the “sandbox” is working:
- The Dark Test:
ping -c 3 8.8.8.8. Result should be100% packet loss. - The DNS Test:
nslookup google.com. Result should beconnection timed out. - The Local Test:
curl -I http://<opnsense-vlan-ip>. Result should be200 OK(if the web GUI is listening) or a refused connection, proving local routing is active.
Related Guides
- Implementation: Private AI Stack Blueprint.
- Introduction: What is Sovereign AI Infrastructure?.
- Hardware: Best VPS Providers for AI Workloads.
FAQ
Q: Can I use pfSense instead? A: Yes. The logic is identical. Create the VLAN, apply the static IP, and implement the “Default Deny Egress” rule.
Q: What about Tailscale? A: Tailscale is a great way to provide secure access into the isolated VLAN. You can run the Tailscale client on the AI node and use OPNsense to ensure that Tailscale is the only way in or out.
Next Steps
For a complete architectural overview, read our Sovereign AI Infrastructure Guide.
OpsNexusAI offers Network Security Audits specifically for AI-intensive environments. Contact us for a technical review of your firewall logic.
OpsNexusAI Engineering
Verified Lab PublicationOpsNexusAI is a technical laboratory dedicated to sovereign AI infrastructure. Every implementation guide and architectural blueprint published here is tested on physical hardware and isolated networks. Our team specializes in the deployment of private LLMs, network hardening with OPNsense, and enterprise-grade automation patterns.
Join the OpsNexus Brief
Get technical teardowns on sovereign AI architectures delivered to your inbox.